

.png)
Event Check-In Stress Testing: Ultimate Pre-Event Guide for Organizers
Learn how to run event check-in stress testing before events. Explore this practical framework to validate throughput, layouts, and more to prevent long queues.
CONTENT
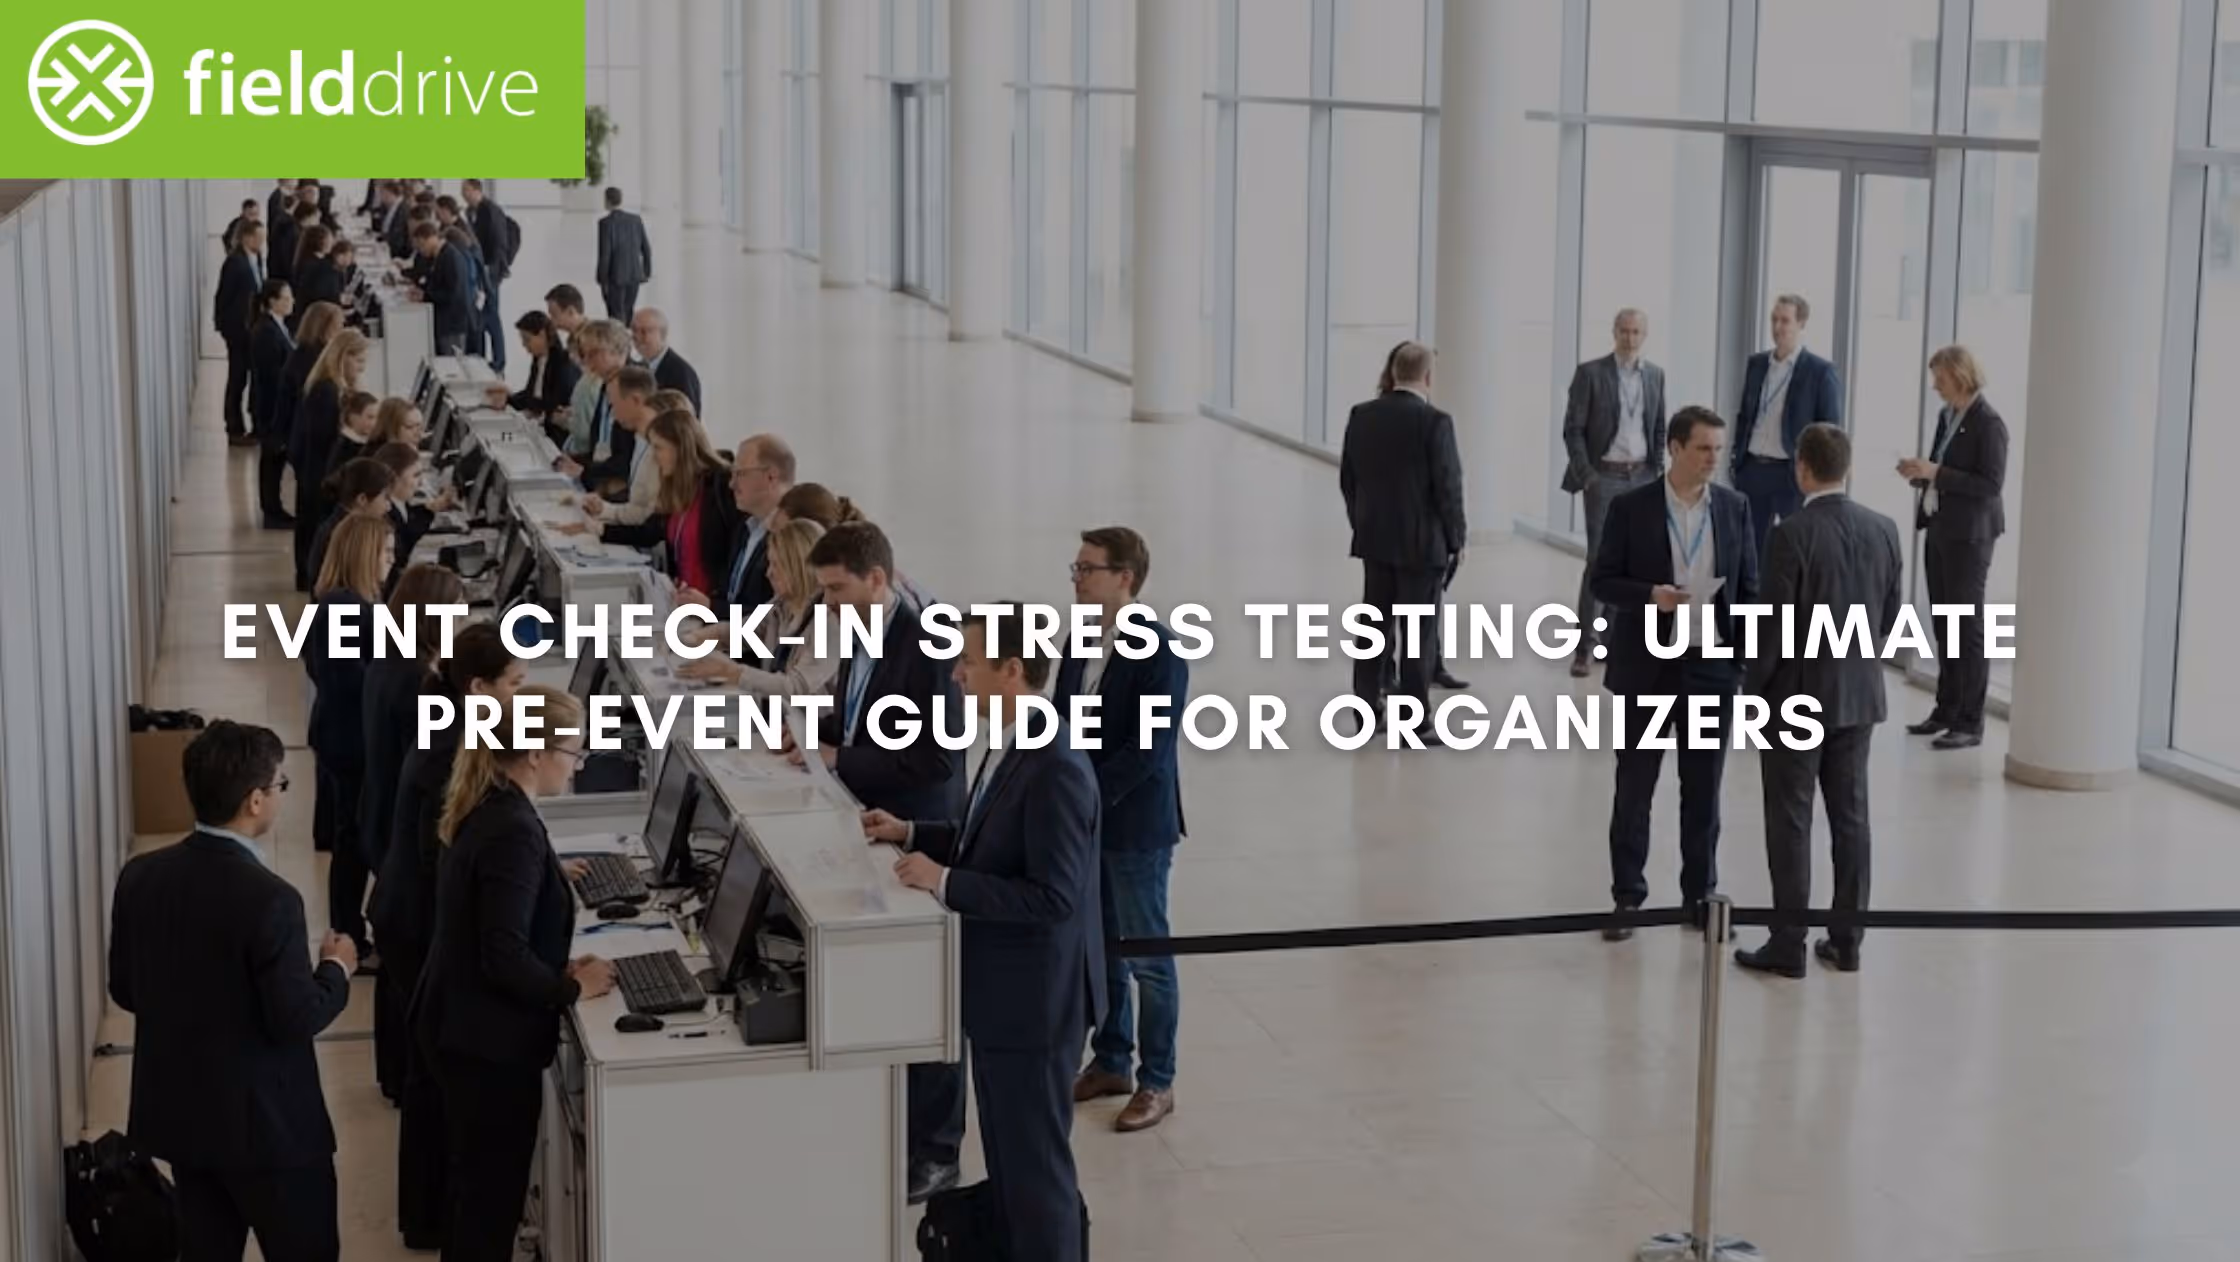
The moment you see a queue building at check-in, you know the pressure is on. When entry slows, your team is forced into manual fixes, exhibitors lose valuable engagement time, and the attendee experience starts on the wrong foot.
That first impression matters more than ever. According to the Freeman Trends Report, 64% of attendees say immersive experiences are the most essential element of a successful event. A congested, chaotic entrance instantly breaks that experience and signals operational friction to everyone walking through the door. This is precisely why event check-in stress testing is critical for large conferences, trade shows, and exhibitions.
In this article, you’ll learn a practical, step-by-step approach to event check-in stress testing. That way, you'll be in a better position to protect attendee experience, reduce onsite risk, and start your event running smoothly from minute one.
Key Takeaways
- Calculate arrivals per minute during your busiest window and test your setup against that load, not total attendance.
- Stress-test kiosks, badge printing, networks, staff roles, and data flows continuously to identify bottlenecks before the event doors open.
- Lock layout and capacity before testing. Align physical flow, hardware ratios, and separate lanes by attendee type so your stress test reflects a realistic onsite setup.
- Apply findings to stagger arrivals, set clear decision thresholds, and align teams on what “success” looks like during peak moments.
- Focus on predictability, not perfection. A good stress test defines limits and responses in advance, so queues stay moving, and data keeps flowing when it matters most.
Why Is Event Check-In Stress Testing Not Optional?
Without proper check-in stress testing, small inefficiencies compound quickly. For instance:
- A printer that slows after dozens of consecutive badges creates visible queues.
- A brief network dip often causes kiosks or scanners to lag.
- One manual exception pulls staff away and disrupts multiple check-in points.
- Delayed entry means exhibitors miss early conversations and high-value leads.
From an operational efficiency perspective, stress testing is your only opportunity to identify and fix failure points before attendees experience them. It reveals where throughput breaks down, where fallback workflows are unclear, and where staffing or layout assumptions don’t align with actual arrival behavior.
How It Works: It simulates peak-arrival conditions to validate that your check-in technology, staffing, and workflows can handle real-world volume without slowing down or failing.
It also protects everything downstream. If check-in data isn’t flowing cleanly, session access control, attendance tracking, real-time dashboards, and exhibitor lead capture all suffer. That’s why experienced teams treat event check-in stress testing as a full-system rehearsal.
Once the stakes are clear, the next step is translating that understanding into a structured process your team can run and repeat with confidence.
Step-by-Step Framework to Run Event Check-In Stress Testing
You need a repeatable framework that your team can actually execute onsite. Below is a practical, operations-first approach to event check-in stress testing, designed for large conferences, exhibitions, and enterprise events. Each step builds on the previous one, so you can move from assumptions to validated performance with confidence.
Step 1: Model Your Real Peak Arrival Load (Not Your Average)
Most check-in issues arise because teams plan for average arrivals rather than peak congestion. Before you test any technology, you need to understand the worst-case arrival pressure your check-in operation must absorb.
What to do:
- Check the total registered attendees.
- Identify your true peak window (usually 30–60 minutes before the first major session).
- Estimate how many attendees arrive in that window based on:
- Agenda timing
- Past event data
- Travel patterns (localites vs out-of-town attendees)
- Calculate expected arrivals per minute.
Simple working formula: Peak check-ins per minute = (Number of attendees arriving in peak window ÷ total minutes)
Example:
- 3,000 attendees at a conference
- 55% arrive in the first 45 minutes
- 1,650 ÷ 45 ≈ 37 check-ins per minute
That number (not total attendance) is what your stress testing must support.
Step 2: Validate Throughput Per Check-In Lane
Now test whether your lanes can meet the peak arrivals-per-minute you calculated. Measure sustained throughput for each lane type (not one-off scans).
What to time (run continuous check-ins for 20–30 minutes):
- Touchless kiosks (QR)
- Touchless kiosks (facial recognition, if used)
- Staff-assisted fallback desks
- Onsite registration counters (if applicable)
Benchmark guide (you must verify with your own test):
- Touchless kiosk check-in can be “single-digit seconds” per attendee depending on the method, badge design, and print workflow. Some vendors claim check-ins in under ~6 seconds under the right setup.
- Manual lookup is typically the slowest lane and becomes your bottleneck during peak arrivals.
Rule: build your capacity plan using your measured averages + a buffer for exceptions (missing QR codes, duplicates, reprints).
Step 3: Stress-Test Live Badge Printing
Badge printing is one of the most common hidden failure points. It often looks fast in isolation, but stress testing reveals whether it can keep pace when printers are running nonstop.
How to test properly:
- Print 50–100 badges back-to-back.
- Multiple badge types (attendee, VIP, exhibitor)
- Use real badge designs (sponsors, double-sided layouts, colour).
- Test multiple printers simultaneously for reloading and error recovery.
What to watch for:
- Print speed degradation over time
- Stock changes mid-test (paper/ribbon) and how long a swap takes
- Jam recovery time and who owns the fix
- Reprint workflow speed (name fix, role change, badge reissue)
Pass condition: printing stays stable under continuous load and your team can recover from jams/stock changes without freezing lanes.
Also Read: The Real Advantages of Live Badge Printing Over Pre-Printing
Step 4: Simulate Real Attendee Behavior (Including the Messy Stuff)
A meaningful stress test reflects how attendees actually behave onsite: incomplete registrations, missing QR codes, name mismatches, and last-minute changes included.
During check-in stress testing, include edge cases, such as:
- Attendees without QR codes
- Name mismatches or duplicate records
- Group arrivals (VIPs, speakers, hosted buyers)
- Onsite registrations
- Last-minute badge reprints
- Attendees checking in at the “wrong” entrance
Pro Tip: Rotate your test participants. Internal staff behave very differently from real attendees under time pressure.
Step 5: Test Network Dependency and Offline Fallbacks
Even the fastest check-in setup depends on connectivity. This step focuses on proving your operation can continue smoothly during network congestion or temporary outages, without queues, data loss, or staff hesitation.
What to test:
- Peak Wi-Fi usage during check-in
- Temporary network drops
- Offline scanning and sync recovery
Why it matters: If offline workflows aren’t tested, teams hesitate to use them, and hesitation slows queues more than technical limitations.
Step 6: Rehearse Staff Roles and Escalation Paths
Stress testing only reduces risk when every issue has a clear owner, a documented fix, and a verified re-test, not when findings pop up on a post-event report.
During your stress test:
- Assign clear roles (greeter, floater, printer support, escalation).
- Log bottlenecks (time, location, cause).
- Test handovers between shifts or peak periods.
- Re-test after every fix.
Ask yourself:
- Does every staff member know what to do when some part of the workflow breaks?
- Are escalation paths clear and fast?
- Can one issue stall multiple lanes?
Step 7: Validate Data Flow Beyond the Entrance
Your check-in stress test isn’t complete until downstream systems are verified. Here, you verify that attendee information flows cleanly and instantly into every system that depends on it. These include real-time analytics dashboards, session access, and exhibitor lead capture. Confirm that:
- Attendance data appears in real-time dashboards.
- Session access control works post check-in.
- Exhibitor lead capture starts immediately.
- Integrations sync correctly with your registration platform.
Key insight: A “successful” check-in that doesn’t pass clean data to exhibitors or analytics tools still fails operationally.
Final Reality Check: If your event check-in stress testing feels uncomfortable, that’s a good sign. It means you’re testing real pressure, not ideal conditions. The goal is predictability. When you know exactly where your limits are, you can design layouts, staffing, and technology that keep queues moving and data flowing when it matters.
However, before carrying out these steps, it’s critical to ensure the environment you'll test reflects a realistic, well-balanced on-site setup. Let's understand how you can ensure that.
Aligning Layout and Hardware Capacity
A stress test only delivers meaningful insights if your event layout and hardware capacity are aligned first. Otherwise, you end up diagnosing avoidable problems that stem from poor planning, not system limits. Here's what you need to keep in mind.
1. Validate Physical Layout Flow
Most event teams focus on how fast check-in is. Fewer test how people move once they’ve checked in.
What to observe during dry runs:
- Do attendees know where to queue next?
- Do they stop to adjust badges near kiosks?
- Do printers, scanners, or help desks create attendee clustering?
- Do you have clear signage visibility in place?
Red flags to watch for:
- Attendees doubling back
- Staff stepping into walkways
- Badge pickup is causing micro-stops.
Also Read: How Interactive Floor Projection Engages Attendees at Modern Events
2. Confirm Hardware-to-Attendee Ratios
Hardware planning should be based on sustained performance, not theoretical maximums. Ask these questions before stress testing:
- Is there a spare printer pre-configured and ready?
- Are kiosks evenly distributed or clustered?
Moreover, use rough benchmarks to validate assumptions:
Also Read: Exhibition Management Guide with Best Practices
3. Separate Check-In Lanes by Attendee Type
Stress testing is ineffective if all attendee types share the same flow. Before testing, confirm separate lanes for:
- General attendees
- VIPs / speakers
- Exhibitors
- Onsite registrations
Why this matters:
- Each group has different processing times.
- Mixing flows hides absolute throughput limits.
- VIP congestion during peak arrivals creates visible reputational damage.
4. Lock This Baseline Before Stress Testing
Once everything is aligned, lock the configuration, document assumptions, and use this setup for your complete event check-in stress testing.
Note: If you change layouts, add sponsors to badges, or adjust staffing later, re-test.
Once the setup is fixed, the focus shifts from configuration to control. Use stress test findings to reduce pressure before attendees even arrive.
How Stress Testing Should Shape Your Arrival Strategy
Event check-in stress testing shouldn’t end with operational tweaks. Its real value comes from how you use the results to shape attendee arrivals, stakeholder expectations, and onsite decision-making before doors open.
This is where many teams fall short, and what you can do to gain a strong position.
1. Use Stress Test Data to Stagger Arrivals Intentionally
Stress testing often reveals a hard truth: even a well-optimized check-in setup has a maximum comfortable capacity.
What you can do:
- Adjust calendar invites and reminder emails to stagger arrivals.
- Assign different arrival windows to:
- Attendees
- Exhibitors
- VIPs / speakers
- Open check-in earlier for specific groups based on throughput limits.
Why this matters: Reducing peak pressure by even 10–15% can eliminate queues without adding hardware or staff.
2. Align Internal Stakeholders on What “Success” Looks Like
Stress test results should set shared expectations across teams. This prevents conflicting decisions when pressure is high. Before the event, align on:
- Acceptable wait times during peak minutes
- When to activate backup lanes or offline workflows
- Who has the authority to make real-time changes?
3. Prepare Exhibitors and Sponsors for Real-Time Data Availability
Stress testing validates when data becomes reliably available, not just that it does. Use testing insights to:
- Brief exhibitors on when lead capture goes live.
- Set expectations for early-session attendance data.
- Avoid last-minute complaints about “missing leads.”
4. Define Go/No-Go Thresholds
Most onsite “crises” escalate because thresholds weren’t agreed in advance. So, don’t improvise under pressure; instead, predefine decisions. Based on stress test outcomes, establish the following:
- Throughput thresholds that trigger extra lanes
- Queue length or time limits that prompt intervention
- Clear escalation paths for tech or ops issues
Also Read: Essential Guide to On-Site Event Management Success
Those insights only become truly valuable when they’re applied in real event conditions. The following case study shows how using stress-tested check-in data and workflows led to smoother arrivals and much more at a high-profile corporate event.
Case Study: How fielddrive Transformed Check-In for Burger King UK
One of the most telling examples of how stress testing and on-site technology pay off in real events comes from Burger King UK’s annual franchise gathering.
Before fielddrive: Manual Bottlenecks and Slow Check-Ins
For the Burger King UK event, which brought together managers, partners, and suppliers from across the country (about 650 attendees), the check-in process created friction:
- Badges were pre-printed and sorted alphabetically, leading to delays and manual look-ups.
- Attendees arriving in multiple groups caused congestion at check-in, slowing entry.
- Attendance tracking was manual, time-consuming, and prone to inaccuracies.
These challenges are precisely the kind that surface when peak-arrival conditions aren’t validated in advance.
fielddrive’s Solution: Fast Check-In + Instant Badging
fielddrive deployed an integrated check-in setup that included:
- Kiosk-based self-check-in with QR codes
- On-demand badge printing (within 6 seconds each), so attendees received badges in seconds
- Real-time analytics to track attendance and lead-related insights
- On-site support to ensure smooth operations and quick issue resolution
Results That Mattered For Organizers
The impact was immediate and measurable:
- Faster check-ins eliminated bottlenecks at the entrance.
- Accurate, automated attendance tracking replaced manual systems.
- Positive feedback from attendees highlighted improved experience and brand professionalism.
The setup directly validated that the technology worked, and it could handle compressed arrival waves without queues or errors.
Final Thoughts
When events struggle at check-in, the root cause is rarely the day itself. Instead, it’s what wasn’t validated beforehand. Effective event check-in stress testing gives you clarity on peak arrival limits and exposes weak points before they become visible queues. That way, it ensures your team knows exactly how the operation will behave under pressure.
This is where fielddrive adds practical value during the stress-testing phase, apart from the event day. It offers GDPR-compliant touchless check-in kiosks, six-second live badge printing, ISO-secure built-in offline workflows, and real-time analytics dashboards. These allow you to simulate arrival volumes, measure actual throughput, and validate complete data flow before the event, using the same setup you’ll run live.
If you’re preparing for a high-volume event and want confidence that your check-in will hold up when required, request a demo. See how fielddrive reduces risk, protects attendee experience, and helps you start your event on solid ground.
FAQs
1. How early before an event should we run event check-in stress testing?
Ideally, you should run your first stress test 3–5 days before the event, with follow-up tests after any layout, badge design, or staffing changes. Same-day-only testing leaves no buffer to fix systemic issues.
2. How many people should participate in a realistic check-in stress test?
A functional stress test typically involves 15–30 participants rotating continuously to simulate hundreds of arrivals. What matters more than headcount is sustained load, repeated exceptions, and continuous badge printing over time.
3. Is event check-in stress testing different for exhibitions versus conferences?
Yes. Exhibitions need testing around exhibitor arrivals, badge reprints, and lead capture going live. On the other hand, conferences are more affected by keynote start times and session access, which create sharper arrival spikes at check-in.
4. How do we factor last-minute registrations into stress testing?
You should simulate a realistic percentage of onsite registrations based on past events. Even a small spike can overwhelm exception handling if not tested, especially when data sync workflows aren’t designed for live additions.
.svg)
.svg)
.svg)
Want to learn how fielddrive can help you elevate your events?
Book a call with our experts today

.svg)