

.png)
.avif)
CONTENT
Are you struggling to keep track of all the moving parts in your event planning? Planning an event can be a whirlwind of tasks, deadlines, and details—sometimes it feels like there’s just too much to manage.
That’s where an event timeline becomes a game changer. It’s more than just a list of dates; it’s the blueprint that keeps your event running smoothly from start to finish, ensuring every task is completed on time and nothing is overlooked.
The global events industry market size is projected to reach $2.5 trillion by 2035, growing at a CAGR of 6.8%. With this kind of growth, staying organized has never been more important. Without a solid event timeline, the risk of missing key deadlines, creating unnecessary stress, and losing track of important details skyrockets.
In this post, we’ll guide you through how to create an event timeline that works. You’ll learn exactly what steps to take at each stage of the event planning process, so you can stay organized, minimize stress, and deliver an unforgettable event.
What is an Event Timeline?
An event timeline is a detailed plan that outlines every step of your event, from the initial planning phase to post-event follow-up. It’s your roadmap for success, helping you organize tasks, set deadlines, and ensure everything happens at the right time.
Think of it as your event's blueprint—without it, it’s easy for things to slip through the cracks. Whether it’s coordinating speakers, booking vendors, or sending invites, a well-structured timeline keeps everything on track, making sure no detail is left behind.
Now that we know what an event timeline is, let's explore why it's essential for a smooth event.
Why Do You Need an Event Timeline?
An event timeline helps you stay organized, reduces stress, and ensures every part of your event is executed flawlessly. Here’s why an event timeline is crucial for your success:
- It keeps everything organized, from planning to execution, ensuring no task is forgotten.
- It sets clear deadlines, making managing time and prioritizing important tasks easier.
- It helps you identify potential problems early on, allowing you to solve them before they escalate.
- It enhances communication among your team, ensuring everyone is aware of their responsibilities and deadlines.
- It reduces stress by clearly indicating what needs to be done, when, and by whom.
- It gives you a sense of control, helping you stay confident as the event day approaches.
Understanding its importance, let’s explore how to create an effective event timeline step by step.

How to Create an Event Timeline?
Trying to keep track of all the moving pieces in event planning can feel overwhelming. From vendor contracts to scheduling speakers, the list of tasks never seems to end. Without a clear timeline, it’s easy to miss deadlines or find yourself scrambling to catch up. But creating an event timeline doesn’t have to be complicated—it’s about breaking things down into manageable steps and staying on track.
Here’s how to actually create an event timeline:
- Start with the big picture: Define your event goals and set a clear date. This gives you the foundation for your timeline.
- Break it down by stages: Divide your planning process into three phases: pre-event, during-event, and post-event. This helps you focus on the tasks that matter at each stage.
- Set deadlines: For every task, set a specific deadline. The earlier you can complete something, the less stress you’ll have later on.
- Assign tasks: Assign responsibilities to your team members so everyone knows what they’re responsible for and when.
- Prioritize tasks: Some tasks, like securing a venue or booking speakers, need to be completed first. Make sure your timeline reflects that.
- Build in buffer time: Leave room for unexpected delays or last-minute changes. Flexibility is key!
- Stay flexible and adjust: Things may shift as you move through your timeline. Make adjustments as needed to keep things on track.
By following these simple steps, you will create a clear and actionable event timeline that keeps everything moving smoothly from start to finish.
Now that you know how to create a timeline, here’s a strategic roadmap to guide your planning process.
Strategic Event Timeline: A Complete Planning Roadmap
Your event timeline should reflect the tasks that need to be completed at each event planning stage. We’ve broken it down into three phases, each with key tasks to cover, helping you stay organized and focused throughout the process. Let’s dive into the essential milestones of creating an event timeline that keeps everything on track.
.avif)
Pre-Event Phase Timeline
8-12 Months Before
- Define Event Objectives and Goals: Identify the purpose of your event and establish clear, measurable goals that align with your business objectives (e.g., increasing brand engagement).
- Establish Budget and Funding Sources: Set your overall budget, break it down by categories (venue, catering, marketing), and explore funding options like sponsors or ticket sales.
- Define Success Metrics: Track success through metrics like attendee satisfaction, engagement levels, leads generated, and brand awareness to evaluate your event's impact.
- Choose the Right Event Format: Based on audience preferences, interaction needs, and available resources, decide if your event will be in-person, virtual, or hybrid.
- Set Your Event Date: Choose a date that avoids conflicts with holidays or competing events, ensuring maximum attendance and giving ample time for promotion.
- Create an Event Team and Assign Responsibilities: Build a team with clear roles (event manager, marketing lead, logistics) and define deadlines to keep tasks on track.
- Develop Event Concept and Theme: Define the central theme that aligns with your goals, setting the tone for all creative decisions, from venue to branding.
- Identify Key Stakeholders and Partnerships: Secure sponsors, speakers, and partners early, communicating the benefits of collaboration to enhance event exposure and opportunities.
5-6 Months Before
- Finding the Perfect Venue: Choose a venue that suits your event’s needs, considering factors like capacity, accessibility, and amenities (AV support, Wi-Fi, catering). Secure the booking early and negotiate terms.
- Design Your Event Layout: Plan the floor layout for smooth attendee flow, ensuring space for registration, booths, sessions, and networking areas. Account for accessibility and logistical needs like seating and AV equipment.
- Make a Marketing Plan for Event Promotion: Define your marketing strategy (digital, print, or both). Set goals for attendance and social media reach. Use engaging content like blogs, videos, and teasers, and partner with influencers to boost visibility.
- Prepare Your Event Collaterals: Design event materials, including logos, invitations, digital brochures, and email newsletters, ensuring they align with your event’s theme and branding.
- Launch Your Website and Early Bird Registration: Create a mobile-friendly website with event details and seamless registration. Offer early bird discounts to encourage sign-ups and use clear CTAs to guide visitors.
- Selecting the Right Technology: Choose the right tech tools (event apps, registration platforms, AV equipment) that support your event’s needs, ensuring smooth integration with your event management platform.
- Locking in Keynote Speakers & Sponsors: Confirm your keynote speakers and sponsors early, ensuring alignment with your event theme. Finalize sponsorship packages, including booth placements and branding.
- Hiring Vendors and Service Providers: Hire essential vendors (catering, AV technicians, photographers) and service providers. Confirm contracts and clarify expectations to ensure smooth event logistics.
- Building a Multi-Channel Promotional Plan: Promote your event across email, social media, ads, and influencer partnerships. Tailor messaging to different audience segments and create engaging teasers to build excitement.
3-4 Months Before
- Create Event Agenda: Set time blocks for each session, break, and networking opportunity. Assign speakers and confirm availability. Balance session lengths to match your audience’s attention span and include buffer time for delays.
- Ramp Up Event Promotion: Intensify promotion with targeted ads, more frequent social media posts, and event-specific content. Collaborate with influencers and share behind-the-scenes content to build anticipation.
- Get Your Speakers and Partners to Promote: Encourage speakers and partners to share event details with their audience using ready-made content like graphics and hashtags. Leverage testimonials to build trust and attract attendees.
- Send Out Pre-Event Surveys: Send surveys to gauge audience interests, session preferences, and logistical needs (dietary restrictions, event format). Use insights to tailor the event experience to their expectations.
1 Month Before
- Plan Speaker/Entertainment Logistics: Confirm travel, accommodation, and schedules for all speakers and entertainers. Ensure they have presentation materials and understand the event’s flow. Coordinate timing for sound checks and rehearsals.
- Arrange Transportation & Accommodation for Guests/Speakers: Book flights, hotel rooms, and ground transportation for speakers and VIPs. Provide clear travel instructions to minimize last-minute stress.
- Announce Remaining Speakers or Additions to Your Agenda: Reveal last-minute speakers or updates to the agenda on your website and social media. Build excitement with teaser posts, speaker highlights, and countdowns.
- Build a Sense of Urgency: Motivate attendees to register by emphasizing limited spots and offering exclusive deals. Use urgency-driven language like "last chance" to encourage sign-ups.
- Plan Your Onsite Technology: Organize your check-in process with systems like fielddrive for efficient, touchless registration. Ensure seamless badging with on-demand printing and set up real-time engagement tools like live polls and event apps.
- Confirm Audio-Visual Equipment: Double-check availability of microphones, projectors, and sound systems. Schedule a rehearsal to test equipment and ensure backup equipment is ready in case of issues.
- Create Contingency Plans: Prepare for potential issues like power failures, speaker cancellations, or venue changes. Assign team members to handle problems and have backup equipment and emergency contacts in place.
1 Week Before
- Finalize Site Details: Conduct a site visit to check the venue layout, equipment, and setups. Confirm signage, speaker arrangements, and registration or networking areas.
- Conduct Rehearsals and Briefing: Run through the event flow with speakers, volunteers, and staff. Review timing, roles, and responsibilities to ensure smooth execution.
- Confirm Attendee Numbers: Finalize attendee count with the venue and caterer. Update catering staff on dietary restrictions or special requests.
- Confirm Hotel Room Block Bookings: Verify room block bookings with partner hotels and check for any unfilled rooms or last-minute cancellations.
- Print Signage & Materials: Print event signage, programs, place cards, and other materials needed for the event day. Prepare directional signs and speaker introductions.
- Coordinate Technical Requirements: Confirm all AV equipment, microphones, projectors, and live streaming platforms are ready. Ensure Wi-Fi is available and have backup plans for tech issues.
- Send Out Final Reminders: Send reminders with event details, schedules, and any last-minute updates. Confirm registrations, transportation, and pre-event instructions.
On The Event Day
- Set Up Venue and Event Spaces: Arrive 2-3 hours early to arrange furniture, set up booths, and ensure all technical equipment is in place. Make signage and attendee info easily accessible.
- Brief Suppliers on Last-Minute Changes: Confirm any last-minute adjustments to the agenda or layout with suppliers. Ensure they are updated on any specific requests.
- Coordinate with Staff and Volunteers: Hold a quick briefing to review roles, responsibilities, and event day schedules. Ensure everyone is aligned on their tasks.
- Manage Registrations and Check-Ins: Use fielddrive for quick, contactless check-ins and badge printing. Ensure staff are ready to assist and streamline the registration process.
- Oversee Event Flow and Timeline: Monitor the event timeline, ensuring sessions and breaks stay on schedule. Coordinate with speakers, staff, and vendors to keep everything running smoothly.
- Review Accessibility Requirements: Check ramps, service dog facilities, and other special requests to ensure all attendees have easy access to event spaces and amenities.
Post-Event Phase Timeline
1 Day Post-Event
- Create a Video Archive Library: Upload recorded sessions to your content platform or event website, organized by session or speaker. Provide attendees with access to rewatch sessions or catch up on missed content. Consider adding downloadable materials or Q&A recordings.
- Send Out Thank-Yous: Send personalized thank-you notes to speakers, sponsors, volunteers, and staff. Show appreciation to attendees with a thank-you email that includes post-event resources or content links.
- Pay Supplier Invoices: Settle all vendor, supplier, and contractor invoices on time. Before making payments, double-check that services were completed per the contract.
3 Days Post-Event
- Send Out Post-Event Surveys: Send a brief survey to gather feedback on attendee satisfaction, session quality, and overall experience. Ask for insights on content, venue, and areas for improvement.
- Review Budget and Final Costs: Compare your initial budget with actual expenses to identify discrepancies. Calculate final costs, including unexpected expenses and potential savings, to refine future event budgeting.
- Analyze Event Data and Measure Success: Review attendee engagement (session attendance, app usage) and lead generation data. Assess sponsor ROI and measure how well you achieved event goals like lead generation or brand exposure.
- Event Reporting for Future Reference: Create a detailed event report documenting key outcomes (attendance, speaker feedback, sponsor success) and lessons learned. Include recommendations for future events and keep it easily accessible for your team.
- Follow-Up with Attendees, Speakers, and Sponsors: Send thank-you emails to attendees and share highlights or content they missed. Reach out to speakers and sponsors for feedback and share insights on the event’s success.

With your timeline mapped out, let’s look at best practices to stay on track throughout the planning process.
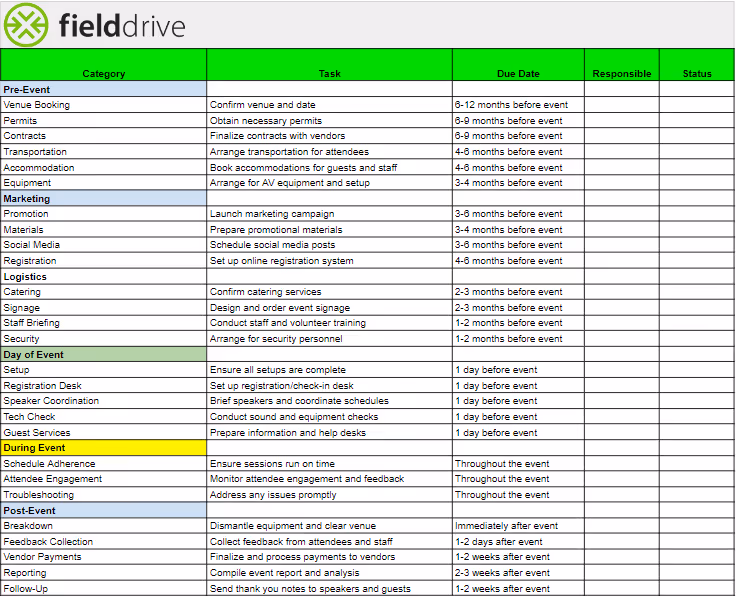
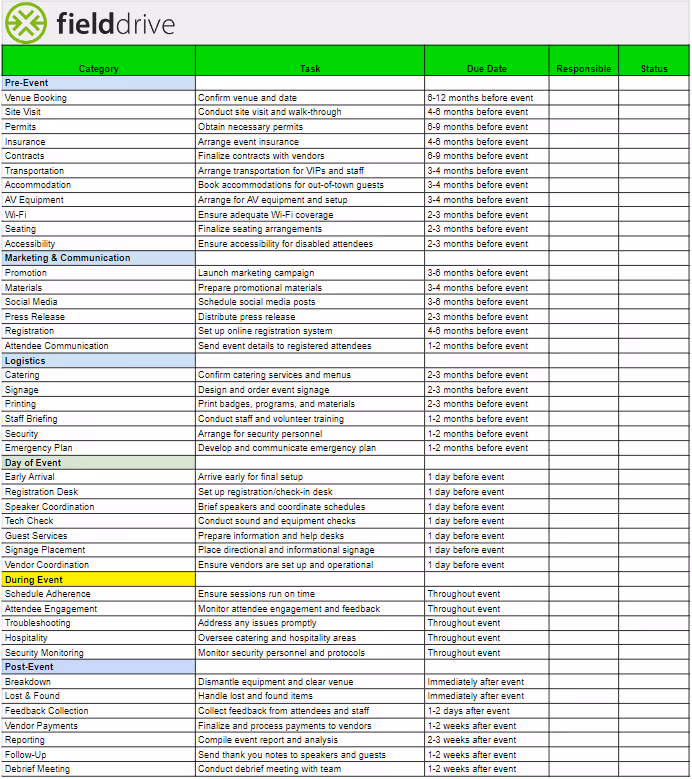
On-site Event Timeline Template
Timeline Template 1:
Timeline Template 2:
6 Best Practices to Stay on Track with Your Event Timeline
Following some key best practices is essential to ensuring your event stays on track. These strategies will help you manage your time effectively, keep everything organized, and avoid any last-minute chaos.
- Set Anchor Points: Anchor points are key deadlines that must be met without fail. These include venue deposit payments, final guest lists, and print deadlines. By marking these non-negotiable tasks on your timeline, you ensure that they get the attention they need.
- Schedule Regular Catch-Up Calls: Stay ahead of potential problems by scheduling regular catch-up calls with your team, suppliers, and venue. Keeping these check-ins will allow you to stay updated on progress and address any concerns early, making the planning process smoother.
- Create Buffer Time: Unexpected delays are inevitable, so build in buffer time for tasks that might take longer than expected. This gives you some flexibility and ensures that any last-minute issues don’t derail your timeline.
- Assign Clear Responsibilities: Clearly outline who’s responsible for each task on your timeline. When every team member knows their role, confusion is eliminated, and things move forward without unnecessary delays.
- Track Progress Regularly: Monitor your event timeline consistently to stay on track. By reviewing your timeline weekly, you can make sure tasks are being completed on time and address any delays before they become problems.
- Communicate Changes Promptly: If any changes occur, notify your team promptly. Keeping everyone updated ensures that your timeline remains intact and no tasks get missed or misunderstood.
Create Effortless Event Experiences with fielddrive
Creating and sticking to a detailed event timeline is essential for a smooth and successful event. By breaking the planning process into manageable stages, setting clear deadlines, and staying organized, you can reduce stress and ensure that every detail is covered. From the initial planning stages to post-event follow-ups, an effective event timeline keeps everything on track and guarantees your event runs without a hitch.
To streamline your event and make the planning process even more seamless, fielddrive offers innovative solutions to keep everything running smoothly. With fielddrive, you can ensure every stage of your event timeline is executed flawlessly—from the first registration to post-event analytics.
- Touchless check-in: Simplify attendee registration with quick, contactless solutions.
- On-demand badge printing: Print customizable, eco-friendly badges instantly.
- Lead retrieval: Collect valuable attendee information in real-time.
- Session tracking: Manage session attendance effortlessly.
- Real-time analytics: Gather insights to measure engagement and event success.
Get started with fielddrive and see how our innovative solutions can make your next event a success. Request a free demo today!
.svg)
.svg)
.svg)
Want to learn how fielddrive can help you elevate your events?
Book a call with our experts today

.svg)